Site Plan Civil Swale Drawings

Green Infrastructure: Dry out swales can be an important tool for retention and detention of stormwater runoff. Depending on design and construction, swales may provide additional benefits, including cleaner air, carbon sequestration, improved biological habitat, and aesthetic value. Run across the section Green Infrastructure for stormwater management.
This page provides a give-and-take of construction specifications for dry out swales (infiltration and filtration-media systems).
Contents
- i Access agreements
- 2 Construction specifications for swale practices
- ii.ane Pre-construction coming together
- 2.2 Site protection
- 2.2.one Pretreatment
- ii.2.2 Temporary erosion and sediment control
- 2.2.3 Compaction prevention
- 2.iii Inspection and documentation
- iii Construction sequence
- iii.one Step 1 – Site examination and preparation
- 3.2 Stride 2 – Excavation
- iii.three Stride three – Decompaction
- 3.4 Step 4 – Subsoil Infiltration Testing for Dry Swales (in-situ soil infiltration swales)
- iii.5 Footstep five – Installation of materials - filter media (if applicable)
- 3.6 Step half dozen – Restoration and plantings
- 3.7 Pace 7 – Terminal stabilization and closeout
- 4 Minnesota Department of Transportation example structure protocols
- 4.1 Preliminary assay and choice
- 4.2 Field verification testing prior to pond construction
- 4.3 Filter media and material testing
- 4.4 Field verification testing/inspection/verification during construction
- 4.5 Notice of Termination (NOT) verification
- five Related pages
Access agreements
An easement is a legally binding agreement betwixt two parties, and is defined as "a not-possessory right to utilize and/or enter onto the real property of another without possessing it. "An easement is required for one party to admission, construct, or maintain any feature or infrastructure on the property of another. Easements can be temporary or permanent. For example, temporary easements can be used if limits needed for construction are larger than the permanent easement footprint of constructed features. Having an easement provides a machinery for enforcement of maintenance agreements to help ensure dry swales are maintained and functioning. See an example admission agreement.
Structure specifications for swale practices
Construction of swale practices incorporates techniques and steps that may be considered nonstandard. It is recommended that construction specifications include project pretreatment devices, construction sequencing, temporary and permanent erosion control measures, excavation and fill, grading, soil decompaction, material specifications, and concluding stabilization. All of these topics are addressed in further detail below.
Additional specifications for items applicable to swale practices can be found in the Minnesota Section of Transportation's (MnDOT) Specifications for Construction. The current version of this resource was completed in 2018. Beneath is a list of MnDOT sections that may exist helpful when writing projection specifications for dry swales.
- 1717 - Air, land and h2o pollution
- 2101 - Immigration and grubbing
- 2105 - Digging and beach
- 2511 - Riprap
- 2571 - Constitute installation and establishment
- 2572 - Protection and restoration of vegetation
- 2573 - Tempest water direction
- 2574 - Soil preparation
- 2575 - Establishing turf and controlling erosion
- 3149 - Granular material
- 3877 - Topsoil cloth
- 3878 - Sod
- 3882 - Mulch material
- 3884 - Hydraulic erosion control products
- 3885 - Rolled erosion command products
- 3897 - Sediment control log
Pre-structure coming together
A pre-construction meeting is recommended and should include a walkthrough of the site with the builder/contractor/subcontractor to identify important features of the work and to review and discuss the plans. This is the all-time time to identify potential issues related to construction methods and sequencing that volition impact site protection, erosion and sediment control, and proper installation of the piece of work.
Site protection
Pretreatment
Pretreatment is a required part of infiltration and filtration practices. Pretreatment is needed to protect BMPs from the build-up of trash, gross solids, and particulate thing. When the velocity of stormwater decreases, sediment and solids drop out. If pretreatment is not provided, this process volition occur in the BMP, resulting in long-term clogging and poor aesthetics.
Warning: The Construction Stormwater general permit states: To prevent clogging of the infiltration or filtration system, the Permittee(s) must use a pretreatment device such as a vegetated filter strip, small sedimentation basin, or water quality inlet (east.thou., grit chamber) to settle particulates before the stormwater discharges into the infiltration or filtration organisation.
Temporary erosion and sediment control
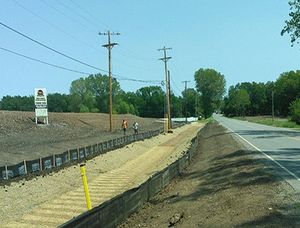
Photo of silt fence used to protect swale infiltration area during structure. Courtesy of 60 minutes Greenish.
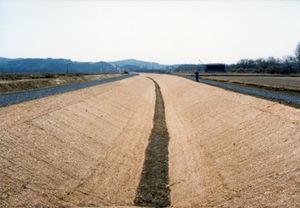
Photo of erosion control mat used to protect swale side slopes from erosion. Courtesy of HR Green.
During construction, information technology is critical to keep sediment out of the swale device equally much equally practicable. Utilizing sediment and erosion control measures volition help to keep swale areas from clogging. As shortly as grading is complete, stabilize slopes to reduce erosion of soils. Protect temporary soil stockpiles from run-on and run-off from next areas and from erosion past wind. Sweep as oftentimes as required if sediment is on paved surfaces to preclude transport offsite past tracking and airborne dust. All sediment and erosion control measures must be properly installed and maintained. When sediment build up reaches one/two the height of the practice, action is required, such as removing the accumulated sediment or installing additional sediment controls downgradient of the original device. Link here for more information.
Potential techniques that could be used to divert runoff and isolate the dry swale may include 1 or more of the following:
- Cofferdam and featherbed pump
- Bypass aqueduct
- Place plastic sheeting over swale when rain in forecasted – anchor with staples, sand numberless, etc.
- Isolate BMP from runoff using sand bags, fiber logs, coir logs, silt fence, or other barrier
- Temporary swimming and bypass pumping
Warning:
- It is REQUIRED that future infiltration swale locations not exist used as temporary sedimentation basins unless 3 feet of cover is left in identify during construction.
- If an infiltration swale area is excavated to final grade (or inside 3 anxiety of) it is REQUIRED that rigorous erosion prevention and sediment controls (eastward.g., diversion berms) are used to continue sediment and runoff infiltration away from the infiltration area until the contributing watershed is stabilized.
Compaction prevention
Preventing and alleviating compaction are crucial during construction of infiltration and filtration swale practices, as compaction can reduce infiltration rates by increasing bulk density of the soil. The infiltration or filtration expanse should be marked with paint and/or stakes to proceed structure traffic from traveling in the surface area.
Inspection and documentation
Inspections before, during, and after structure are needed to ensure swale practices are built in accordance with the plans and specifications. Information technology is recommended that onsite inspectors are familiar with project plans and specifications to ensure the contractor'southward interpretation of the plans are consistent with the designer'southward intent. The inspectors should accept frequent photos and notes of construction activities and features as work progresses and at all critical points (such as immediately prior to backfilling). They should check dimensions and depths of all installed materials. All materials and products should be verified or tested for conformance with the specifications.
A construction checklist is constitute here.
Structure sequence
Step 1 – Site examination and training
It is the responsibility of the contractor to
- examine the areas for performing earthwork and make up one's mind that weather condition are satisfactory to proceed, or to correct all unsatisfactory conditions prior to starting work;
- arrange to locate, mark, and protect all existing utilities and underground facilities in the areas of work; and
- remove all existing features marked for removal and required earthwork.
Footstep 2 – Excavation
For in-situ soil infiltration dry out swales, cut the swale and infiltration expanse every bit shown on the plans. Where possible, excavation should be performed with a backhoe and work should be done from the sides and outside the footprint of the infiltration expanse to avoid soil compaction. If it is necessary to work in the infiltration area, only low footing pressure tracked equipment should be allowed to consummate the work. Rubber tire equipment should be strictly prohibited within the infiltration expanse, unless working from pavement outside of the basin or trench. The contractor should start the work at the far side of the trench or basin and work their fashion out.
The contractor is to ensure all laws and regulations are followed regarding stability of excavations. This may crave shoring, bracing, sloping, or benching. Materials should non be stockpiled virtually the border of the digging. Drainage and control of h2o in the excavation must also be considered.
Warning: It is REQUIRED that infiltration systems not be excavated to final form until the contributing drainage area has been constructed and fully stabilized.
For filter media dry swales, cut the swale area and sub-cutting the filtration area as shown on the plans. Where possible, digging should be performed with a backhoe and piece of work should be done from the sides and outside the footprint of the filtration area. The contractor should commencement the work at the far side of the trench or basin and work their way out.
The contractor is to ensure all laws and regulations are followed regarding stability of excavations. This may require shoring, bracing, sloping, or benching. Materials should non be stockpiled near the border of the excavation. Drainage and command of water in the earthworks must also exist considered.
Footstep 3 – Decompaction
Soil decompaction is required in all swale lesser areas with the exception of the bottom of the sub-cut for filter media dry swales. Decompact subsoil with a backhoe ripper attachment or other approved method to a depth of at least xviii inches below subgrade in all locations indicated on the drawings. Also known every bit soil loosening or soil ripping, this technique has been shown to increase infiltration and reduce compaction from construction activities. For more information on alleviating compaction, link here.
Step 4 – Subsoil Infiltration Testing for Dry Swales (in-situ soil infiltration swales)
Subsoil infiltration testing is HIGHLY RECOMMENDED for dry swales depending on in-situ infiltration. Afterward the subsoil is decompacted, test the infiltration area to verify the causeless infiltration rate and that the infiltration area will drain dry within 48 hours.
This tin be accomplished by performing double ring infiltrometer tests (ASTM D3385) in the bottom of the basin, or by filling the infiltration basin and timing how long it takes to drain from maximum water depth to dry bottom. The measured infiltration charge per unit should equate to double the designed infiltration rate. If the bowl is filled with water to perform this cheque, be sure sediments are not being done into the basin during filling. If sediments are washed into the basin, they need to exist removed prior to placing infiltration media.
If the basin does not drain dry within 48 hours (24 hours is recommended for trout waters), or the infiltration rate is slower than twice what was assumed in the design, additional soil loosening or modification may exist necessary. Information on soil testing can be found hither.
Step 5 – Installation of materials - filter media (if applicable)
Soil test results should exist provided to the designer a minimum of two weeks prior to delivery of filter media to the site. Submitted test results should include gradation and USDA soil texture classification or certification that the soil mix meets MnDOT specifications or other requirements. Samples of the mixed product should exist also provided to the designer two weeks prior to delivery of media to the site. The designer should review the materials as soon every bit possible to avoid whatsoever potential delays in the procurement and review of some other media source should the initial submittal not meet specifications.
All accumulated sediment and silt from the lesser of the facility should be removed prior to the placement of filtration media. The contractor should make every attempt possible to identify the filtration media in a mode to minimize compaction of the subgrade and the filtration media itself. No construction vehicles are allowed in the filtration area subsequently the media is placed unless approved by designer. Loose placement of filtration media shall be accomplished past dumping from the edges and spreading with the bucket of a backhoe, which is outside of the filtration area, or some other acceptable ways determined by the designer. If spreading with a backhoe is not possible for the entire area of the filtration area, only tracked sideslip steers or other depression basis pressure equipment should be permitted in the basin to spread the filtration media. This method should be minimized as much equally possible. Travel over placed filtration media should be strictly prohibited.
The contractor should overfill the filtration media areas approximately 20 per centum to account for consolidation of the loose soil one time wetting occurs. Any small irregularities at the designed finished grade should exist worked out with hand tools.
The contractor should contact the designer upon last placement of media for a final inspection prior to planting and mulching. At this inspection, the designer should cheque thickness and grades after soil wetting occurs and notify the contractor of areas that do non meet the tolerances specified. Tolerances in concluding grade are unremarkably vertically +/- 0.i pes and horizontally +/- 0.five foot.
If fourth dimension goes past between the initial placement of infiltration media and planting, the contractor should be required to remove accumulated silt. This work is also a run a risk to perform any final subgrade grading adjustments required to obtain the finished grades as shown on the drawing.
Step half dozen – Restoration and plantings
After concluding placement of grading and filtration media (if applicable) has been approved, planting or seeding should happen as soon as possible to avert erosion, sedimentation, and the establishment of weeds. The contractor should notify the designer at least four days in advance of when planting or seeding will occur in advance of delivery of materials to the site to allow for scheduling of site inspections. At to the lowest degree two weeks prior to the planting or seeding dates, any existing weeds should be thoroughly eradicated mechanically or with herbicide within the project expanse. Follow herbicide recommendations regarding elapsing to look between application and seeding/planting.
Warning: It is REQUIRED that the planting or seeding contractor take proven successful experience installing and maintaining projects of similar scope and scale and provide a superintendent that will be onsite during the unabridged seeding or planting procedure.
All seed and plants should exist shipped and stored with protection from atmospheric condition or other conditions that would damage the product. All plants and seeds will exist inspected by the designer and items that take become wet, moldy, or otherwise damaged in transit or in storage should exist rejected. Plants and seed should go far within 24 hours of commitment. Plants and seed needs to be protected against drying and damage prior to planting.
It is typical for the plant or seeding contractor to guarantee the work for some length of time. The common minimum for herbaceous plantings or sod is 60 days during the growing season. The growing season in cardinal Minnesota is defined every bit May 1st through Oct 31st. A one-year guarantee on containerized plants tin help to ensure good institution and decrease weed infestations while maintaining infiltration rates over time through the growth of healthy root systems. Whatever watering required to keep the plants healthy should be covered under the cost of the warranty period. It is appropriate to require that the contractor provide some course of surety, such as a letter of credit or other security, to the permitting entity for 150 pct of the estimated costs and quantities of all herbaceous plants or seeding for the elapsing of the 1-year warranty catamenia. Planting and seeding establishment should see the requirements inside MnDOT Section 2571.
Caution: Seeding maintenance requires specialized knowledge and feel in plant and weed identification. Ensure a thorough maintenance plan is established prior to construction and that budget has been allocated for at to the lowest degree three full growing seasons and preferably longer. Native seedings can be more difficult than containerized plantings to establish.
For information on plants recommended or suitable for swales, link here.
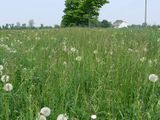
- Examples of advisable plants for dry swales. Click on an paradigm for enlarged view.
-

Apartment-topped goldenrod
-
-
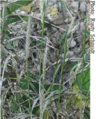
Virginia wild rye
Pace 7 – Final stabilization and closeout
Equally defined in the NPDES/SDS Construction Stormwater allow, terminal site stabilization is achieved when all soil agonizing action is completed and the exposed soils have been stabilized with a vegetative cover with a uniform density of at least 70 percent over the entire site or by equivalent means to prevent soil failure. Simply seeding and mulching is not considered acceptable encompass for final stabilization. Final stabilization must consist of an established permanent encompass, such as a perennial vegetative cover, concrete, riprap, gravel, rooftops, cobblestone, etc.
All filtration (filter media) and infiltration areas must be tested for infiltration rates after they are completed in gild to submit the NPDES Notice of Termination. It is highly recommended that all infiltration areas are tested prior to projection shut out, even if an NPDES let is not required.
MnDOT projects require at least 5 tests per acre of infiltration area and a minimum of v tests per infiltration expanse. Infiltration rates shall meet or exceed double the design charge per unit assumed. The examination results from a MnDOT project must be submitted to MnDOT.
When a final construction inspection has been completed, log the GPS coordinates for each facility and submit them for entry into the local BMP maintenance tracking database, if applicative.
Minnesota Department of Transportation instance construction protocols
Preliminary assay and choice
Recommended number of soil borings, pits or permeameter tests for bioretention pattern. Designers select one of these methods.
Link to this table
| Surface area of stormwater control measure (BMP)(ft2) | Borings | Pits | Permeameter tests |
|---|---|---|---|
| < thou | i | 1 | 5 |
| 1000 to 5000 | 2 | 2 | 10 |
| 5000 to 10000 | 3 | 3 | 15 |
| >10000 | 41 | 41 | 202 |
1an additional soil boring or pit should be completed for each additional 2,500 ft2 to a higher place 12,500 fttwo
iian additional v permeameter tests should exist completed for each additional 5,000 ft2 above 15,000 fttwo
Field verification testing prior to pond construction
- Soil hydraulic grouping represent what is stated in SWPPP (Stormwater Pollution Prevention Programme)
- Seasonally high water table not discovered within 3 feet of the excavated pond base of operations within a test pit
- Commonly will test bottom of proposed pond for soil compaction (subsequent subsoil ripping) prior to media placement
- Commonly will test bottom of proposed pond for insitu infiltration rate by examination pit or water filled barrel placed on pond base surface
Filter media and material testing
- Existing soil (option 1 below) or Done sand (selection 2 beneath), and compost certification
- Done class aggregate choker certification
- Other treatment material certification of iron filings, activated charcoal, pH buffers, minerals, etc.
- Geotextile separation fabric certification
- Drain-tile certification (if filtration is specified)
- Seed source certification
- Butt test verification of infiltration rate using 2.5 feet of imported 3877 Blazon G media
Field verification testing/inspection/verification during construction
- Water drains away in 48 hours
- Infiltration drainage charge per unit does not exceed 8.3 inches per hour
- No tracking/equipment in pond lesser
- No sediment deposits from ongoing construction activity, media perimeter controls kept functional
- Forebay is trapping settleable solids, floating materials, and oil/grease
- Area staked off
Observe of Termination (NOT) verification
- Selection 1. Amending existing HSG soils with compost or other treatment textile. Exam the infiltration rate of each infiltration basin using a double ring infiltrometer prior to completion of the bowl. Bear the examination at the finished grade of the basin bottom, prior to blending the compost with the in-situ soils or sand. Ensure infiltration rates meet or exceed greater of ii times the designed infiltration rate or 2 inches per hour. Conduct a minimum of five tests per representative acre of basin area and a minimum of v tests per basin. Conduct double ring infiltrometer tests in accordance with ASTM standards. Thoroughly moisture test areas prior to conducting infiltrometer tests.
- Option 2. Importing 3877 Blazon G Filter Topsoil Borrow (may exist amended with other handling material). Ensure infiltration rates meet or exceed greater of two times the designed infiltration rate or 2 inches per 60 minutes, or rate specified in the plan. Comport a minimum of five tests per representative acre of basin expanse and a minimum of 5 tests per bowl. Conduct double ring infiltrometer tests in accord with ASTM standards. Thoroughly wet exam areas prior to conducting infiltrometer tests. Amend soils with additional washed sand if rates less than specified in the contract, or compost if rates exceed 8.3 inches per hour.
The permanent stormwater management system must meet all requirements in sections 15, 16, and 17 of the CSW permit and must operate every bit designed. Temporary or permanent sedimentation basins that are to be used as permanent water quality direction basins accept been cleaned of whatever accumulated sediment. All sediment has been removed from conveyance systems and ditches are stabilized with permanent embrace.
- Terminology for swales (grass channels)
- Overview for dry swale (grass swale)
- Types of infiltration
- Types of filtration
- Design criteria for dry swale (grass swale)
- Structure specifications for dry swale (grass swale)
- Operation and maintenance of dry swale (grass swale)
- Assessing the operation of dry out swale (grass swale)
- Calculating credits for dry swale (grass swale)
- Cost considerations for dry swale (grass swale)
- Instance studies for dry swale (grass swale)
- Plants for swales
- Check dams for stormwater swales
- External resources for dry swale (grass swale)
- References for dry swale (grass swale)
- Requirements, recommendations and information for using dry out swale (grass swale) without an underdrain in the MIDS estimator
- Requirements, recommendations and information for using dry swale (grass swale) with an underdrain in the MIDS calculator
- Requirements, recommendations and information for using swale side gradient as a BMP in the MIDS calculator
- Dry swale (grass swale) and interesting websites
Source: https://stormwater.pca.state.mn.us/index.php?title=Construction_specifications_for_dry_swale_(grass_swale)
0 Response to "Site Plan Civil Swale Drawings"
Postar um comentário